|
Script Editor |
| The Script Editor is
the most powerful tool in IGOR. This portion will cause you the most
grief and if you don't have any prior programming experience, there
is not much I can do to help you. I would highly recommend taking a
course at your local college or university. IGOR script is very
similar to BASIC so anything related to that will aid you
tremendously. At the very least, refer to
Wolfsong's tutorial and the IgorScripting.txt file located in
your Ghost Recon directory. To access the Script Editor you must go
up to the Script menu and select Edit.
Here is a picture to aid you:
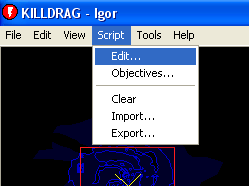
After you select
this it brings up the Script window which is displayed below:
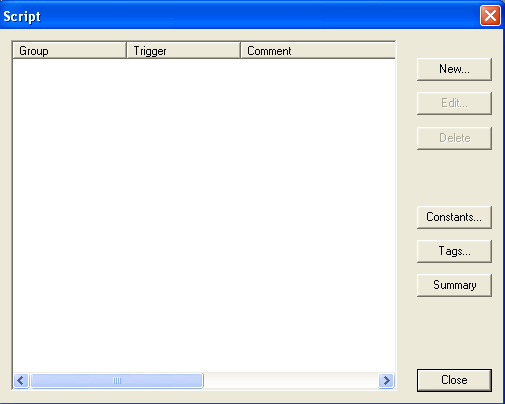
The big white portion
displays a list of all of the script blocks that you have input into
the mission through the editor. When you save your mission the
script is compiled so the engine can read it during runtime and
execute your instructions.
New:
Click on this button to open the Block window. The Block window is
where you enter the script for individual blocks to be executed
during runtime. We'll get into that in a little bit after I explain
the rest of the Script Editor Window's functions.
Edit:
Highlight an existing Script Block and click on the Edit button to
open the Block Window. Use this when you need to add or remove
Responses from the block.
Delete:
This will delete a Script Block. IGOR should warn you that you'll
lose it. If that is what you want to do just click on okay and move
on with your life.
Constants:
To access the Constants window click on the Constants button. This
is where you create/edit/delete constants that can be easily
accessed from many of the Response Windows' queries. I would like to
take a moment to stress the importance of using constants whenever
possible. If you ever need to continuously use the same value(s),
then make it a constant if it requires multiple keystrokes to enter
the information into the script. This will save you a ton of time in
scripting, typos, and debugging. A couple of examples of it's use
are: "DisplayMessageAll" in conjunction with a debugging string,
Random number storage for high and low values, or the name of a wav
file. I have used all of these methods in my script in the past and
I am sure that you can figure out a whole bunch more on your own.
Basically, if I am working on a random artillery barrage script and
want to play with the Random numbers to get the proper timing of the
effects, I enter constants for the low and high numbers that I want
to generate. This way if I need to adjust the timing, I don't have
to go back and edit 125 (or whatever) script responses; I only
adjust the constants.
Integers are whole numbers both positive and negative and include
the value of 0.
Numbers include floating point values. (i.e., 1.1)
Strings are text.
Tags:
This button opens the Tag Editor. I'll get to it in a little bit.
Bascially, it allows you to create/edit/delete your own tags for the
engine to read during runtime.
Summary:
Clicking on this button allows you to open your script in Notepad.
Too bad we can't just edit the script here... This is a useful
function anyhow. I use it to print a hard copy of my script for
proofreading offline. Useful for debugging.
Here is a picture of an empty script in Notepad that was accessed by
the Summary button:
Close:
This button closes the
Script Editor and returns you to IGOR.
|
|
Constants |
|
To access the
Constants window, click on the Constants button.
Here is a picture of the Constants Window:

The Constants Window
is broken down into two sections. The top one is where you add and
define the constant. The window below displays a list of all the
current constants that you have entered. From here you can Edit or
Delete the constants if desired.
Type:
There are three types of constants to choose from. Integer, Number,
or String.
Integers are whole numbers both positive and negative and
include the value of 0.
Numbers include floating point values. (i.e., 1.1)
Strings are text.
Name:
Give your Constant a name that is easy to remember. This name will
appear in the Response window from the drop-down menu usually in a
query area. Depending on the type of Constant, it may or may not
appear in this drop-down menu.
Value:
This is the value of the constant. Integers must be whole numbers
(including zero). Numbers pretty much include everything including
floating point values. Strings are text values.
During the mission testing process you can come back to the
Constants Window to change these values for a quick change. The
change will affect all of your script blocks. In other words,
Constants in IGOR are global.
To change the value of a Constant, highlight the one that you want
to change (it's name, value, and type will appear above; type will
be grayed out), then highlight the name or value and click on the
Apply button.
|
|
Tags |
| The Tag Editor can be
accessed by clicking on the Tags button.
Here is a picture of the Tag window:
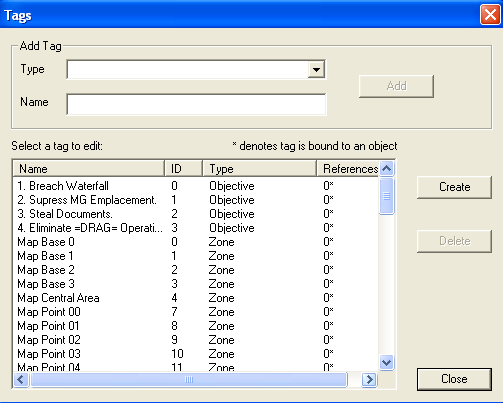
The Tag Editor is
broken down into two areas. The Top portion is for the user to
create new tags for the engine to reference during runtime. All
objects placed on the map and objectives tagged in the Objective
Editor are assigned a tag by default which will be displayed in the
list below. The bottom portion displays all current tags in the
mission file. You can click on the categories to sort the list
(Name, ID, Type, References). If you have read the Objectives editor
section, you can see that the objectives that we tagged in that
utility are displayed here. Generally, you will only need to add a
tag to refer to something in the script that isn't placed on the
map.
Add Tag
Type:
Select the type of Tag that you wish to add. I'll get into the types
later in the Mission Section.
Name:
Give your tag a memorable name. Then click on the Add button to add
it to the list.
Select a Tag to Edit
This is the bottom portion. Sometimes tags are not removed from the
script even though you have deleted the object. Sometimes you may
wish to change the name of your tag. This is where you access those
functions. Prior to releasing your mission to the public, it is a
good idea to clean out the unnecessary tags. You might gain a
millisecond in load time, but most of all it will give your work a
professional look. Left over, unused tags will give the impression
of a sloppy script. It is a good idea to become anal while
scripting; it'll reduce the amount of bugs that might arise. Believe
me, others will look at your work and there are a ton of judgmental
people out there. If the tag is unused, the Delete button will no
longer be grayed out. Click on it to discard the garbage.
|
|
Block Window |
| To access the Block
Window, click on the Edit button with a Script block selected or the
New button.
Here is a picture of the Block Window:
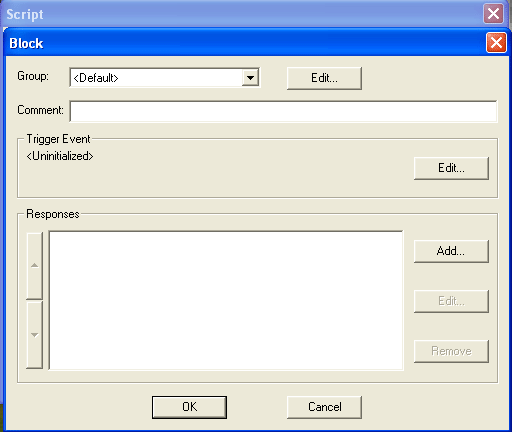
Group:
There is a drop down menu to access user created groups on the
right-hand side of this list. Click on the Edit button to open the
Tag Window to create a new group. I'll discuss the Tag window in a
little bit.
Comment:
Enter a short, sweet memorable comment here. The comment will be
displayed on the left hand side of the Script Editor and is very
useful for locating a script block once the window becomes filled
with multiple blocks.
Trigger Event:
This is what causes the script to execute. You have to have a
Trigger Event to add a Response. Don't worry, IGOR will let you know
in case you forget. Click on the Edit button within this portion of
the window to access the Trigger Event Window. We'll go over that
below.
Responses:
The Responses are displayed in the small window on the left. They
are executed starting with the one on top and ending with the last
Response on the bottom. There are two arrows on the left of this
window that will do two things: Scroll through the window once it is
full or with a response highlighted will change it's order of
execution in the Block. The three buttons on the right enable you to
either Add a new Response, Edit an existing Response (it must be
highlighted), or Delete an existing Response (it must be
highlighted). Clicking on either the Add or Edit button will open
the Response Editor.
|
|
Trigger Event |
| To access the Trigger
Event Window you will have to first access the Block Window via the
Script Editor. There is an Edit button in this section. Click on it
to bring up the window.
Here is a picture of the Trigger Event Window:

The Top drop-down menu
allows you to access a whole list of Trigger Events. It is limited,
but with a little thought you should be able to figure it out. Refer
to the IgorScripting.txt file located in your Ghost Recon
installation directory for more information. There is a grayed-out
portion displaying the text that will appear in your Summary.
Generally there are other parameters that you will set by accessing
the windows below via their tabs and buttons. Once you have your
Trigger event set, Click on the Okay button. Once again, don't worry
if you forget a parameter. IGOR will remind you to go back and
complete them.
|
|
Responses |
| Refer above if you
have forgotten already.
Here is a picture that shows the Responses Window
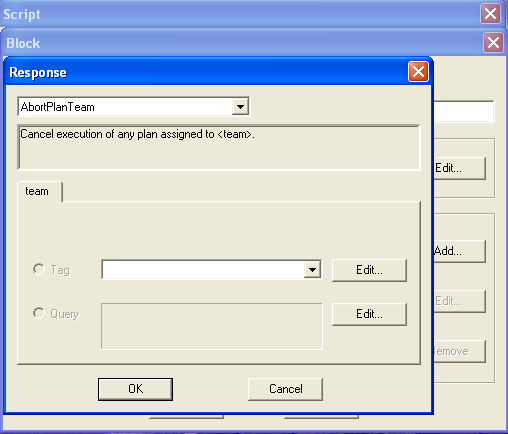
There are even more
Responses than Trigger Events. Refer to the IgorScripting.txt file
in your Ghost Recon directory for more information on Responses.
You'll learn a lot more once we start scripting the mission in this
area.
|
|
